This is a basic tart crust recipe for pâte brisée, also used for pie crusts, with step-by-step photos and tips I've learned from hundreds of pie crusts I've made over the years.
Instructions for making this all-butter crust 100% by hand or using a food processor are included plus the best way to roll out any pastry dough, shaping it into a tart pan, and blind-baking.
Jump to Recipe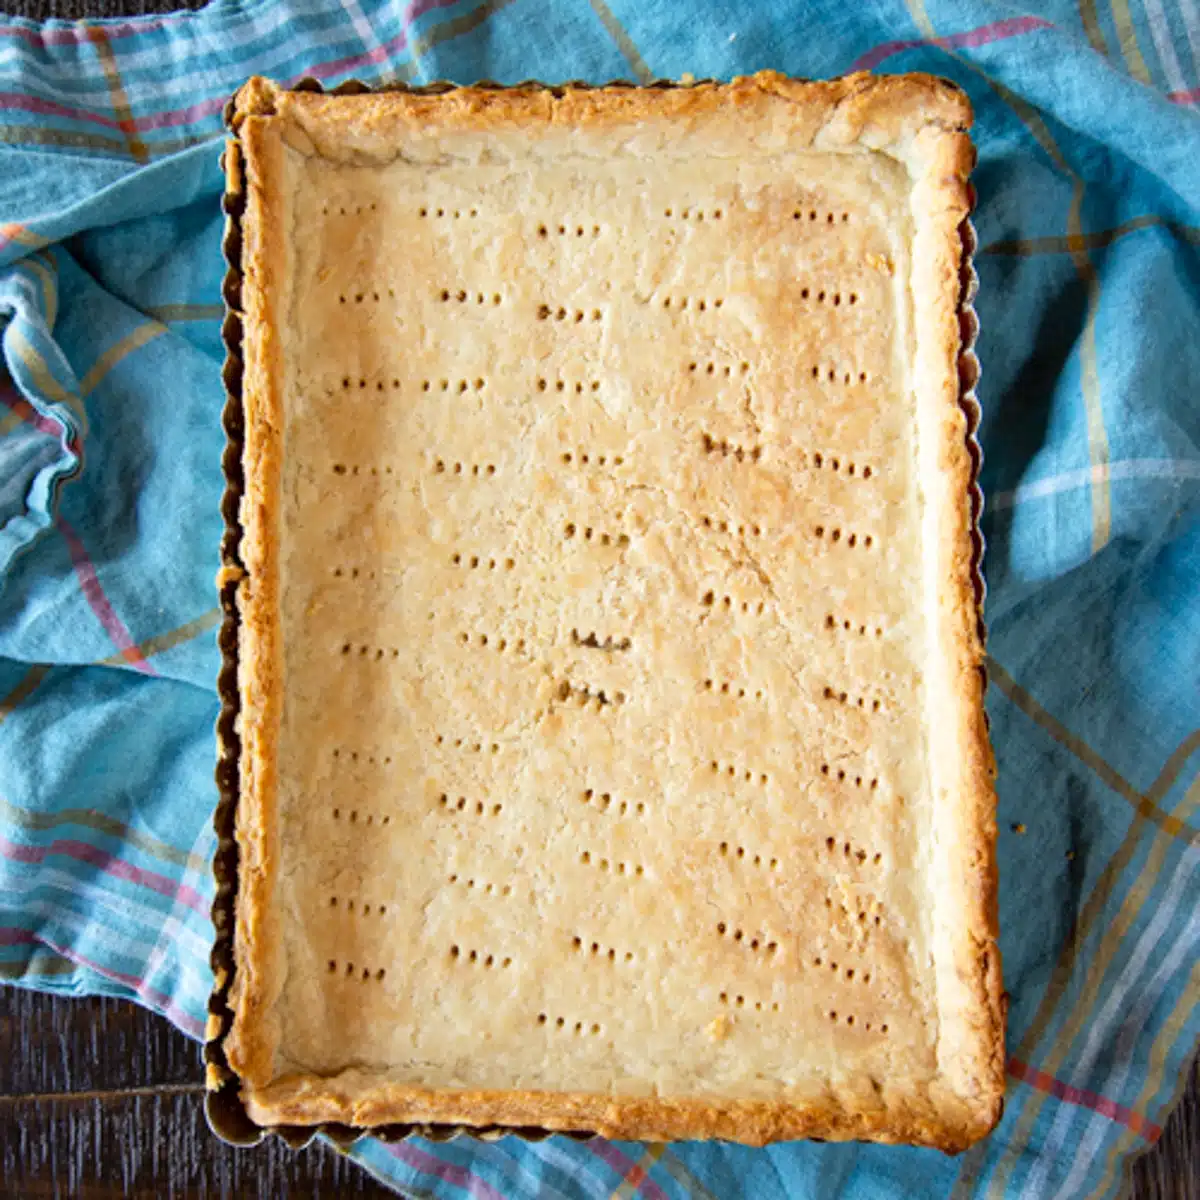
Want to make this recipe perfectly the first time? I want to help with that. So, check out this Table of Contents to see which sections of this post will help you the most.
Jump to:
- 👩🍳 What is pâte brisée?
- 🥧 Is a tart crust the same as a pie crust?
- ❤️ Why you'll love this recipe
- 🥬 Main Ingredients + Notes
- 👩🍳 Pastry Flour vs All-Purpose Flour
- 👩🍳 Butter vs Shortening for Pastry Dough
- 🔪 Recommended Equipment
- 📝 Instructions: Making Pâte Brisée Dough
- 👩🍳 Can I use grated butter to make this pastry crust?
- 📝 Instructions: Rolling out Pastry Crust
- 📝 Instructions: Fitting Pastry Crust Into a Tart Pan
- 📝 Instructions: Blind Baking a Tart Crust
- 🧊 Can I make this tart crust ahead?
- 🥬 Make it Vegan
- Ultimate Tutorial for Basic Tart Crust with Photos
A homemade tart crust turns a great tart into a fabulous dessert that everyone raves about. And it's not complicated. Once you nail this, you'll never buy a frozen pie crust again.
This pastry crust recipe is the one I use when I make fruit tarts, like these blueberry tarts (a favorite recipe of my mom's), and savory tarts, like this zucchini and corn tart. It's also perfect for galettes like this apple galette and my savory delicata squash and apple galette. I promise after making this a couple of times, the process moves along with little effort.
👩🍳 What is pâte brisée?
Pâte brisée is a simple pastry dough commonly used for sweet and savory pies, tarts, and galettes. It's typically an all-butter crust and traditionally omits sugar. Current versions sometimes include a small amount of sugar.
This pastry crust is one of the three types of shortcrust pastry in French cooking.
🥧 Is a tart crust the same as a pie crust?
The ingredients and process are the same, but they are presented differently from each other.
- A tart only has a bottom crust. A pie can have both a bottom and top crust.
- Tarts are baked in tart pans that have a removable bottom and sides that are straight up. The tart is always removed from the pan to finish cooling before serving.
- Pies are served in the pie plates they are baked in, which have angled sides to make it easier for serving.
❤️ Why you'll love this recipe
- Flaky tender crust. The process includes fraisage, a French technique to create layers of butter. This is what promotes a flaky and very tender crust.
- Simple ingredients. You only need 5 ingredients, and you probably already have them in your pantry.
- Consistent. This recipe has never failed me. It's foolproof.
- Make ahead. You can make the crust ahead and refrigerate.
- Delicious. It makes every tart shine.
🌱🌱🌱
🥬 Main Ingredients + Notes
The secret to faster and easier meals often lies in the ingredients. For example, store-bought items and ingredients you make ahead and store in the refrigerator (or freezer) can turn a 60-minute recipe into a 30-minute meal or less.
For all of the ingredients, measurements, and directions for this basic tart crust recipe, go to the Recipe Card at the bottom of this post.
- All-purpose flour - King Arthur Flour has some of the most consistent flour that's manufactured to some of the tightest parameters in the industry. Also, it has a slightly higher protein count, which makes it a little easier to work with.
- Unsalted butter - Always use unsalted butter to give you control over how much salt is added. It needs to be used straight from the refrigerator. Do not ever bring it to room temperature first. Chilled butter lets you create the layers that make a crust flaky and tender.
- Kosher salt - I prefer kosher salt because its shape makes it more forgiving. There's a much lower risk of over-salting. If you use table salt, use half the amount recommended.
- Vinegar - Vinegar promotes a tender crust. Use a neutral-flavored vinegar such as champagne vinegar or citrus-infused vinegars. Apple cider vinegar is perfect for fall tarts.
- Ice water - Ice water prevents the butter from softening too much inside the dough.
👩🍳 Pastry Flour vs All-Purpose Flour
You can use either one when making a pastry dough. Pastry flour has a more tender crust but is also more fragile to work with.
👩🍳 Butter vs Shortening for Pastry Dough
An all-butter crust creates a lighter crust with more layers than a crust made by combining butter with shortening or with just shortening. This article on the King Arthur Flour website gives a great explanation of why this is true.
As for flavor, I prefer the flavor of an all-butter crust, but it's a personal preference.
Disclosure: This post may contain affiliate links to products and foods I use in my kitchen. This means that at no additional cost to you, I will earn a commission if you click through and make a purchase. To view my entire storefront of recommended kitchen tools and equipment, check out my shop on Amazon.
🔪 Recommended Equipment
Having the right equipment for recipes makes prepping much easier. If you want more fuss-free prepping and cooking, check out my updated list of favorite kitchen tools and equipment.
These are the tools I use when making any pastry dough. I don't use the pastry blender method anymore, but did for years. I now use a food processor. But I include both in this basic tart crust recipe in case you don't have a food processor or pastry blender.
- Kitchen scales - Always weigh flour when baking anything. It only takes a few seconds, and scales are inexpensive.
- Medium-size mixing bowl
- Pastry blender - for cutting the butter into the flour.
- Food processor - for making the dough instead of using a pastry blender.
- Bench scraper - for fraisage. A bench scraper makes scraping up the fraisaged dough easier and faster, but anything with a straight edge that won't scratch your work surface is fine.
- Wax paper - to roll out the dough more quickly and easily.
- Rolling pin
- Tart pan with removable bottom
- Ceramic Pie Weights - dried chickpeas and dried kidney beans also work great.
🌱🌱🌱
📝 Instructions: Making Pâte Brisée Dough
These Instructions include step-by-step instructions using both a pastry blender and a food processor. The photos show how the dough looks in different stages, except you don't need to chop the butter into small pieces when using the food processor.
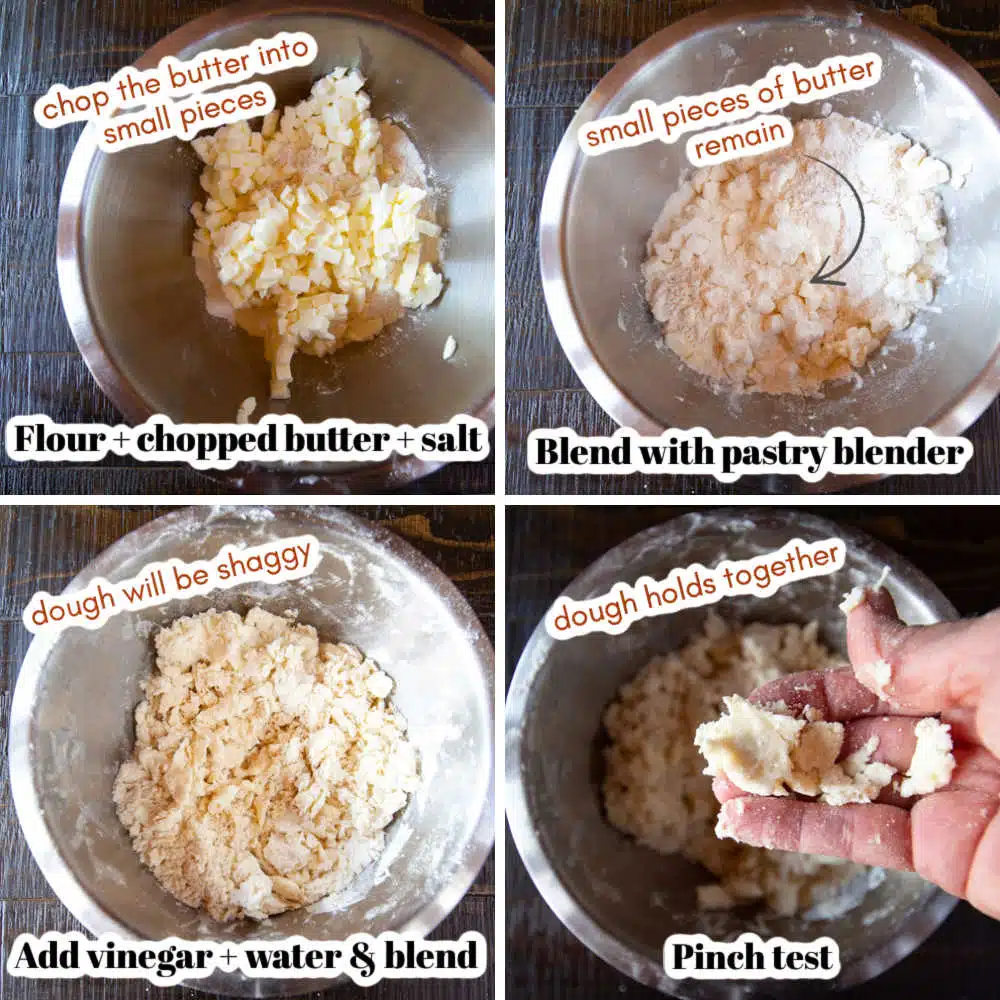
Step 1 (Pastry Blender Method)
Combine flour, butter, and salt. Weigh the flour, chop up the cold butter, and combine with the salt in a medium-sized mixing bowl. Toss together with a wooden spoon to coat the butter with flour.
Step 2 (Pastry Blender Method)
Blend. Press the blades of a pastry blender into the flour mixture repeatedly until you have a coarse meal. The butter pieces should be no bigger than a pea.
Step 3 (Pastry Blender Method)
Add liquids. Add the vinegar and three tablespoons of ice water. Work the liquid into the dough using a wooden spoon.
Add additional ice water, one tablespoon at a time, until the dough appears shaggy and passes the pinch test. Take a small amount of the dough between your fingers and pinch it together. The dough should hold together when it's ready for fraisage.
Steps 1 and 2 (Food Processor Method)
Blend. Weigh the flour and chop each stick of butter into eight pieces. Combine them with the salt in the bowl of a food processor fitted with a metal blade. Buzz it for about 5 seconds. Remove the processor lid and check the size of the butter pieces using a fork. Pulse until the butter pieces are no bigger than a pea.
Step 3 (Food Processor Method)
Add liquids. Follow the instructions for the Pastry Blender Method. Buzz the processor for 5 seconds until some of the dough comes together. Then, pulse until it passes the pinch test. Be careful not to over-process the dough. Occasional bits of butter should be visible in the dough when done.
Step 4 (Both Methods)
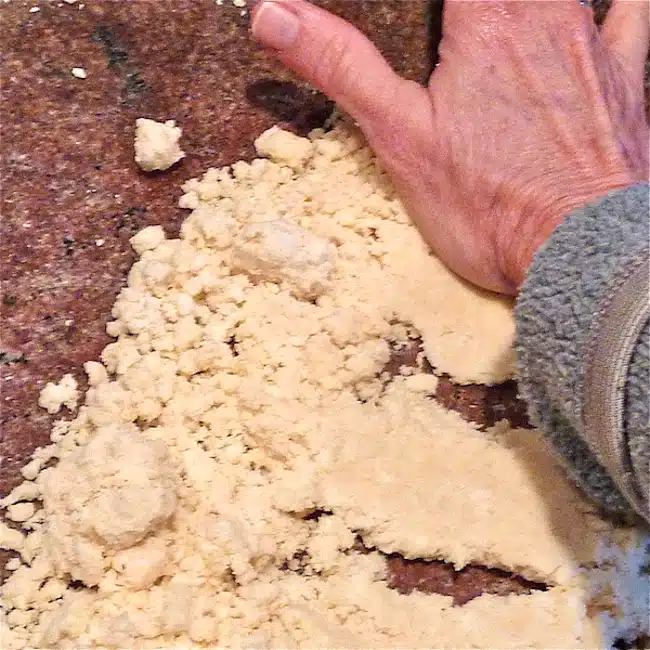
Fraisage. This is the secret to a flaky crust with layers. Transfer the dough, including any loose flour, onto a workspace. Using the heel of your hand, smear the dough away from you on the counter. Scrape the dough and any loose pieces together using the bench scraper, and repeat two more times.
When finished, all of the flour will be absorbed into the butter with occasional small pieces of butter in the dough. (You can see this clearly in the below image.)
Step 5 (Both Methods)
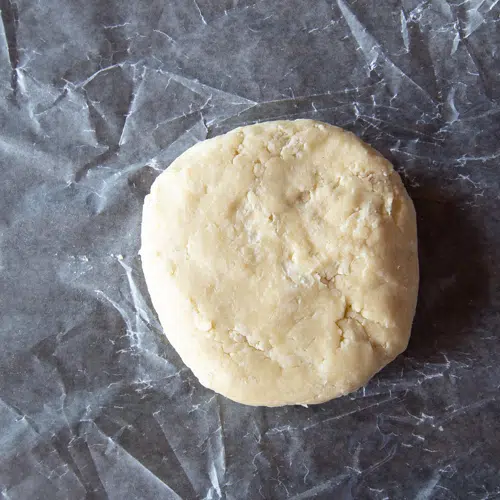
Chill. Shape the dough into a flat disc using your fingers, wrap it in wax paper or plastic wrap, and refrigerate for 20 minutes.
👩🍳 Can I use grated butter to make this pastry crust?
Yes, if using the pastry blender method. However, if you grate the butter using the food processor method, the butter will mix completely into the flour, and the crust won't be flaky.
This is the best method for grating butter for the pastry blender method.
- Freeze the sticks of butter for 30 minutes or until they are firm.
- Grate the butter into a bowl using the largest holes of a grater, such as a box grater.
- Return the grated butter to the freezer for another 10 - 15 minutes before adding it to the flour.
🌱🌱🌱
Now that you have a beautiful disc of pastry dough, the next step is to roll it out and fit it into a tart pan.
📝 Instructions: Rolling out Pastry Crust
I've rolled out a hundred or more pie crusts over the years, and this method is the quickest way I've found to keep the dough from getting overworked and over-floured.
Dough that is rolled out too much or is continuously sprinkled with flour ends up being a tougher crust when baked. It also shrinks more while it bakes.
Step 1
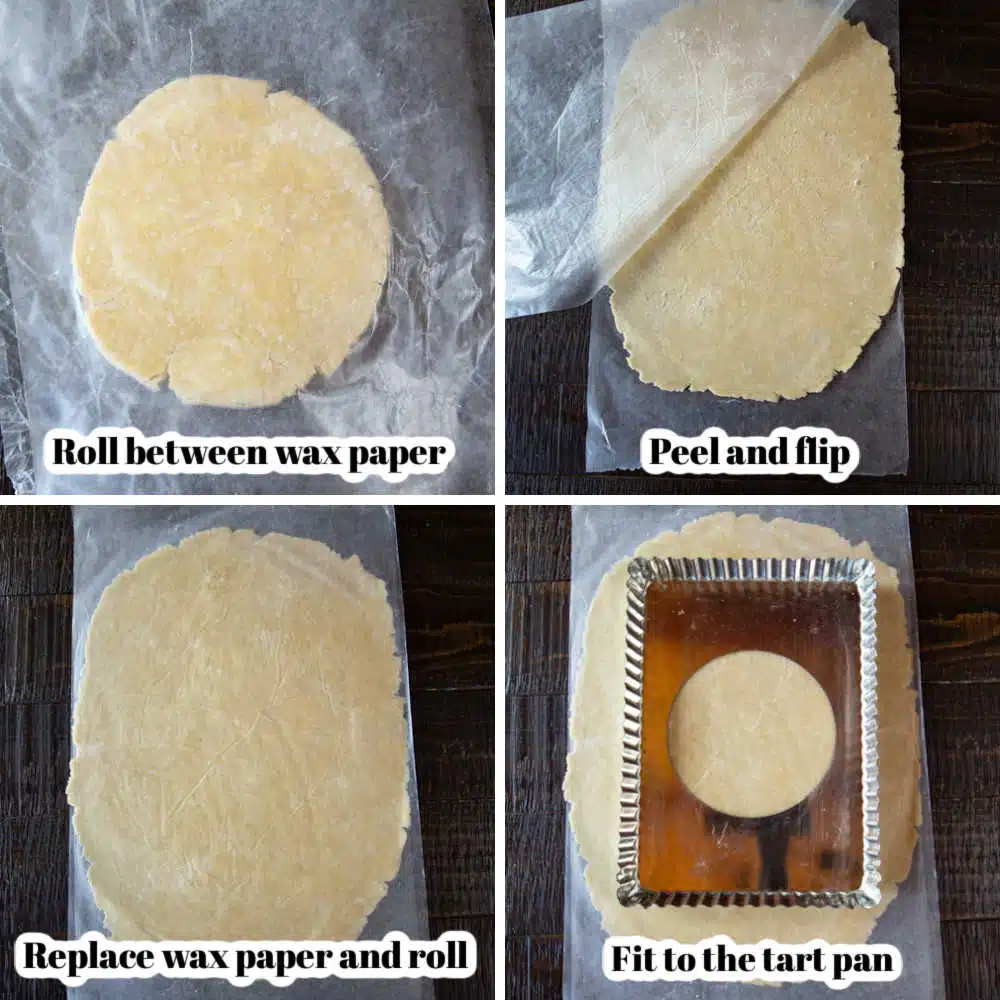
Wax paper. Remove the dough you made from the refrigerator and sandwich it between two sheets of wax paper. Roll a few times to begin to flatten it out and peel off the wax paper. Pinch together any cracking around the edges, replace the wax paper on top of the dough, and flip it over.
Step 2
Continue to Roll. Roll the dough out a little further, repeating Step 1. Each time you flip the dough over, peel the wax paper from both sides of the dough and then lay it back down on the dough before rolling again. This allows the dough to move more quickly with each roll and gives you the opportunity to pinch any edge cracks together.
As you roll out the dough, keep in mind the shape of the tart pan it will fit into, and try to roll it out to that shape.
Size. Place the tart pan over the dough as it approaches the size you want to ensure it will fit into the pan. Don't forget to take the sides of the pan into consideration.
Rolling Tips:
- Keep the wax paper in place on the counter by draping one end over the counter and bracing it with your body.
- Always roll away from you.
- Turn the dough to roll it in various directions.
- Don't roll over the edges of the pastry dough, as this makes the edges thinner than the rest of the rolled dough. Instead, stop rolling just before reaching the edge of the dough.
- If pieces of butter in the dough become sticky, return the dough to the refrigerator for a few minutes. Or sprinkle a little flour over the area, lightly rub it into the dough, and reapply the wax paper.
🌱🌱🌱
📝 Instructions: Fitting Pastry Crust Into a Tart Pan
Raise your hand 🙋♀️ if you've rolled out a gorgeous dough and then it completely messes up on the way to your tart pan. Maybe it folded in half on itself.
Permanently.
Or it rips when you try to reposition it on the tart pan.
Here are the steps I take to fit this basic tart crust pastry dough into a tart pan, crimp the edges, and prepare the crust for blind baking if the recipe calls for it.
Step 1
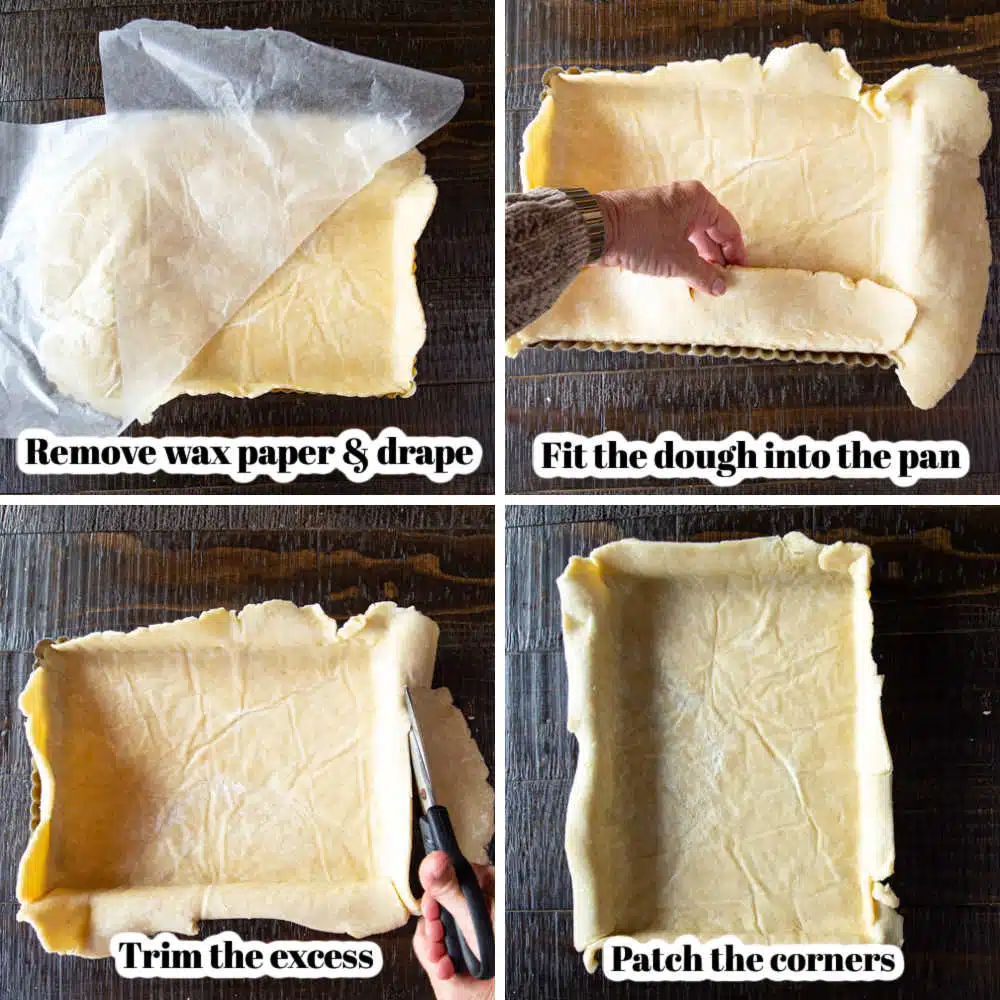
Chill. Chill the dough for 5 - 10 minutes before removing the wax paper. This makes it easier to handle the dough when positioning it into a tart pan. It doesn't need to lay perfectly flat in the refrigerator. But lay it as flat as possible.
Step 2
Drape. Remove one sheet of the wax paper, center the dough over the tart pan with the dough side facing down, and gently drape it over the pan.
Peel off the other sheet of wax paper while bending the dough into all of the corners. Don't tuck the dough tightly into the pan yet.
Step 3
Lift and tuck. Once the wax paper is removed, lift each side of the dough and tuck it closely back into the edges and corners of the tart pan. The dough should have 100% contact with the pan.
Step 4
Trim the edges. Roughly trim the edges with kitchen scissors, leaving one-half inch of dough all around. Use the excess dough to patch any area where the dough is short, for example, around the corners.
Step 5
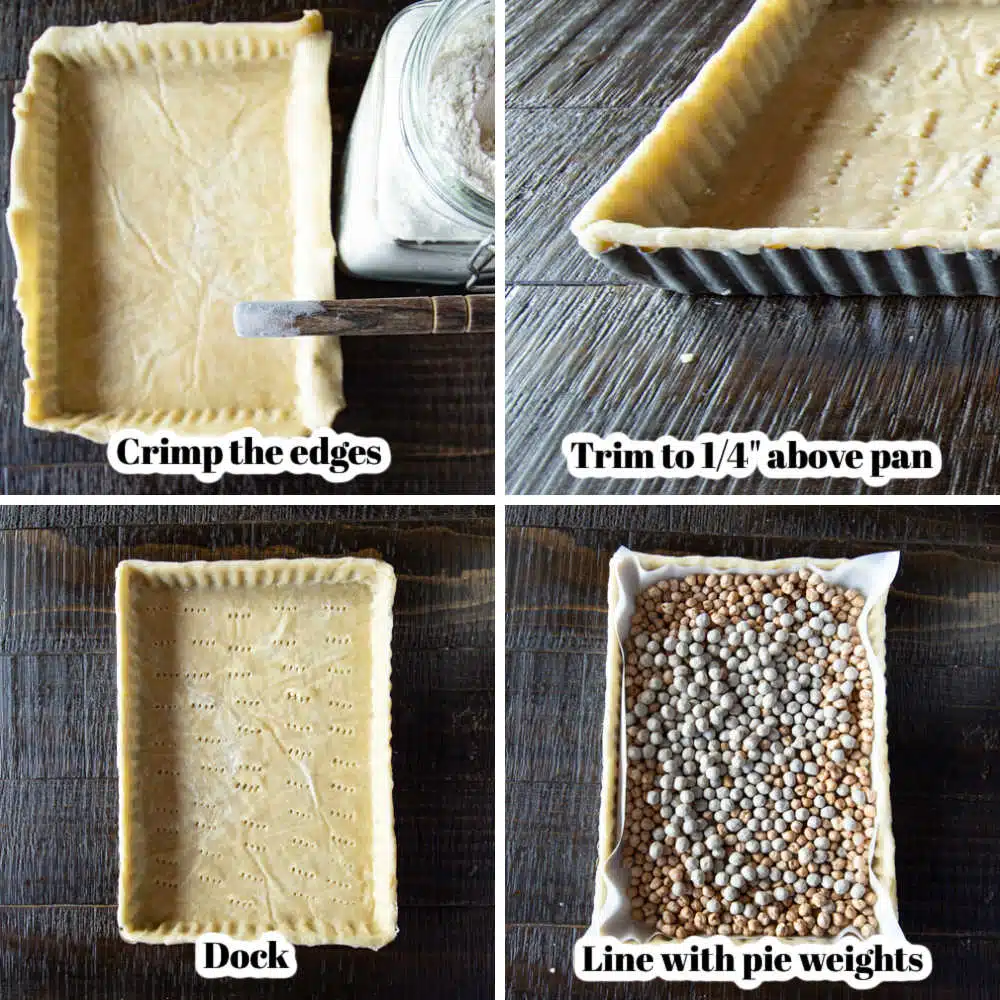
Crimp. Using your fingers or the round handle of a wooden spoon, gently press the dough into the fluted edges of the tart pan. Be sure to flour your hands or dip the handle in flour before creating the scalloped edges with the dough.
Step 6
Trim the edges to ¼" above the sides of the tart pan in case the crust shrinks a little during baking. Even it out with your fingers while making sure none of the crust hangs over the tart pan.
You're now ready to fill and bake a tart unless the recipe you're following calls for the crust to be blind-baked.
🌱🌱🌱
📝 Instructions: Blind Baking a Tart Crust
Blind baking is also called par-baking, indicating that a tart crust should be baked before it's filled. Recipes that may call for blind baking include quiche, no-bake pies, some custard pies, and tarts with veggies that have a high moisture content.
Blind baking can be tricky as the crust wants to lift up off the tart pan from steam being released by the butter. These are my steps to blind baking that never fail me.
Step 1
Dock (pictured above). Use the tines of a fork to puncture the dough all across the bottom of the pan. This is called docking, which allows steam to escape.
Step 2
Pie weights (pictured above). For extra protection, line the docked dough with parchment paper and fill the tart with ceramic pie weights. If you don't have pie weights, use dried beans such as chickpeas and kidney beans. (But don't use them for soup afterward.) This keeps the crust in contact with the bottom of the tart pan while it bakes.
Step 3
Chill. Slide the tart pan into the refrigerator to chill for at least 15 minutes while the oven preheats to 425˚F. Chilling the dough just before baking helps it to keep its shape and not shrink while in the oven.
Step 4
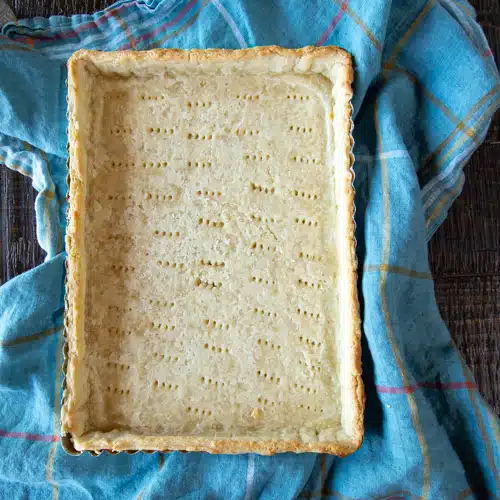
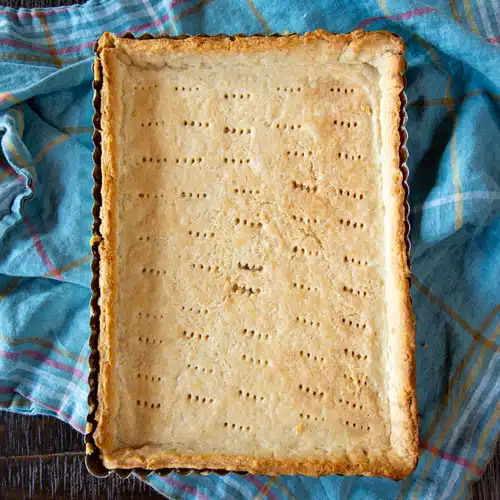
Bake. Bake for 20 minutes on the middle rack. Lift up the parchment paper to check the crust. Once it starts to set up and is a light golden brown (pictured below), remove the pie weights and parchment paper. For tart shells that will be filled and then baked, no further blind baking is typically needed.
Step 5
For no-bake tarts. Slide the tart pan back into the oven and continue baking according to the recipe directions. I typically bake the tart shell for another 10 - 15 minutes until it's nicely browned (pictured below).
The exact time will depend whether you're using a gas or electric stove, and your altitude, so be sure to check the crust every 5 minutes.
This may feel like a lot of steps, but after a few times of making this basic tart crust recipe, it goes very quickly - especially if you use the food processor method. And the results are worth the extra effort.
🌱🌱🌱
🧊 Can I make this tart crust ahead?
Yes. There are at least two places where you can stop the recipe and store the dough.
- Before rolling it out, slide the wrapped disc of pastry dough into an airtight container or zipped storage bag and refrigerate for up to 3-4 days or 1 month in the freezer. Defrost the dough in the refrigerator and warm it a bit on the counter before starting to roll it out.
- When the tart is ready to be filled or blind-baked, double-wrap it in plastic wrap and slide it into the refrigerator for up to one day before baking.
🥬 Make it Vegan
If you want to make this crust vegan, check out this recipe for a vegan pie crust that uses coconut oil in place of butter.
Ultimate Tutorial for Basic Tart Crust with Photos
Equipment
- Kitchen scale
- Food Processor
- Bench Scraper
- rolling pin
- 8.5" X 11" Tart pan
- Ceramic Pie Weights or dried beans
Ingredients
- 10 ounces (2 ¼ cups, 300 grams) all-purpose flour (10 ounces, or 2 ¼ cups)
- 2 teaspoons kosher salt, or 1 teaspoon table salt
- 16 tablespoons unsalted butter chilled
- 1 tablespoon white wine vinegar
- 4 - 5 tablespoons ice water
Instructions
Make the Dough
- Weigh the flour and slice the butter into tablespoon-size pieces. Fill a small bowl with ice cubes and water. Transfer the weighed flour, butter, and salt to the bowl of a food processor fitted with a metal blade.Buzz for about 5 seconds, and then pulse until the butter pieces are no larger than a pea. The best way to check this is by using the tines of a fork.
- Add the vinegar and three tablespoons of ice water and pulse the flour mixture a few times in the food processor until it begins to pull together into a dough. You may need to add additional water, one tablespoon at a time, for this to happen. As soon as this begins, perform a pinch test. Take a little flour mixture in your hand and pinch it together. If it holds together, it's ready for fraisage even though there is a fair amount of loose flour in the bowl.
- Spill the contents of the food processor bowl onto a work surface. Pile it up as best you can. Using the heel of one hand, push into the flour mixture and away from your body to smear it across the counter. Re-pile the flour mixture together using a bench scraper, and repeat twice, or until a dough forms with almost all of the flour and butter. This is a French technique called fraisage, and is critical to creating flaky layers.
- Shape the dough into a disc and wrap it in wax paper or plastic wrap. Chill for 20 - 30 minutes before rolling out the dough.
Rolling Out the Dough
- Remove the dough from the refrigerator and unwrap it. Sandwich the disc between 2 sheets of wax paper and begin to roll out the dough. After a few rolls, peel away the top sheet of wax paper and pinch together any cracked edges. Flip the disc over and repeat.
- Continue rolling out the dough between the sheets of wax paper, peeling them off to release the dough and reapplying them each time you flip the dough over. This allows the dough to expand more easily with each roll.
- Rolling Tips: * When rolling out the dough, drape one end of the wax paper over the counter and anchor it in place with your body. * Always roll away from you. * Turn the dough to roll out all sides to fit the shape of the pie plate or tart pan you plan to use.
- Place the tart pan over the dough to make sure the dough will fit into the pan. Don't worry about the corners, if you're using a rectangular tart pan. You'll use excess dough to patch those areas as needed.
Transfer the Dough to a Pie or Tart Pan
- Chill the dough still sandwiched in the wax sheets for 10 minutes before fitting it into the pie plate or tart pan. This makes this buttery dough much easier to work with.
- Peel off one sheet of wax paper and gently position and drape the dough over the edges. Slowly peel away the other sheet of wax paper while bending the dough up the sides of the pan.
- Lift each side of the dough and tuck it closely into the edges and corners of the tart pan. The dough should have 100% contact with the pan.
- Trim the dough with kitchen scissors to ½-inch above the tart sides. Patch any short areas, such as the corners, with the excess dough and gently smooth it in so that the crust is the same height all the way aroudn the tart pan.
- Flour your fingers or the round handle of a wooden spoon and gently press the dough into the fluted edges of the pan.
- Trim the edges to about ¼" above the height of the tart pan to allow for a little shrinkage.
For Blind Baking
- Preheat the oven to 425˚F. While the oven preheats, chill the dough for at least 15 minutes in the refrigerator. If you chill it for longer than 30 minutes, cover it with plastic.
- Puncture the dough all across the bottom of the tart pan using the tines of a fork. This process is called docking, and it helps keep the dough from lifting off the pan during baking by letting steam escape.
- Cut a piece of parchment paper to a size that is larger than the bottom of the pan and its sides. Tuck it along the bottom of the tart, gently creasing it up the sides of the pan. Fill the parchment paper with pie weights or dried beans to ensure the entire bottom of the tart crust is weighted down.
- Place the tart pan on a baking sheet and bake for 20 minutes on the middle rack. Remove the pie weights and parchment paper if the crust is starting to set up and is a very light golden brown. Depending on the type of tart you're making, this may be as much baking as needed. Follow the directions for the tart you're making.Bake for another 15 - 20 minutes for a no-bake pie, or according to the directions of your tart recipe. The crust will be golden brown and firm.

Leave a Reply