

Want to Save This Recipe?
Enter your email & I'll send it to your inbox. Plus, get great new recipes from me every week!
Secret Recipe Club time, with a traditional Middle Eastern layered onion bread!
Oh my gosh you guys. This bread is so good. I've been on a bread kick lately, so as soon as I got my Secret Recipe Club assignment this month, I headed straight for my secret blog’s breads. Wait. Let's back up a bit.
For the uninitiated, The Secret Recipe Club is a group of around 100 food bloggers, separated into three smaller blogging groups, each of which post at different times of the month. Every month, we’re each assigned a blog in our group to look through. We try a few recipes and chose one to post about. But all month, we keep our assignment a secret until ‘reveal day’. It’s been a lot of fun – and I’ve found some great new blogs to follow and new recipes to add to my rotation.
I was doing the happy dance when I saw I was assigned to Sawsan at Chef in Disguise this month. Her recipes all look so inviting, and her photography is delicious. When I see her photos, I just want to reach into my computer screen and take a bite.
Sawsan is an orthodontist by day, self-described food explorer by night, and invites her readers to learn about her life as a woman living in the Middle East. She’s Palestinian by birth, raised in Jordan, and now living in the United Arab Emirates with her husband and two children, so I’d say she’s an expert on this.
She’s also an expert cook and baker. If you’re drawn to Middle Eastern food, her blog is a must-read for you. She cooks with fresh fruits and vegetables and shares authentic regional recipes she was raised on, from her grandmother and mother, as well as her own creations. She has a section on cheese-making, another on sour dough breads, and a page on authentic Middle Eastern and Arabic ingredients.
As I mentioned, I’ve recently re-engaged in baking my own breads, so that’s where I headed. I was sorely tempted by her Moravian Kolaches (Dvojctihodné / Moravské koláče) since I was in the Czech Republic last fall, and her Cheese Bread Wreath which shares some fascinating information on Ramadan. Apart from breads, I want to make everything else on her blog. Seriously.

Ultimately I latched onto this amazing Jordanian Matabaqa - a Layered Onion Bread. Sawsan provides a video and photos of how to make it, which I recommend you watching, but I promise you it’s pretty easy. I had some holes in the first couple of dough balls that I stretched, but I got the hang of it by the third one. And honestly, because of all the layers, it really doesn’t matter if there are a few holes. It’s very forgiving. It's more important is to get the bread layers very thin.
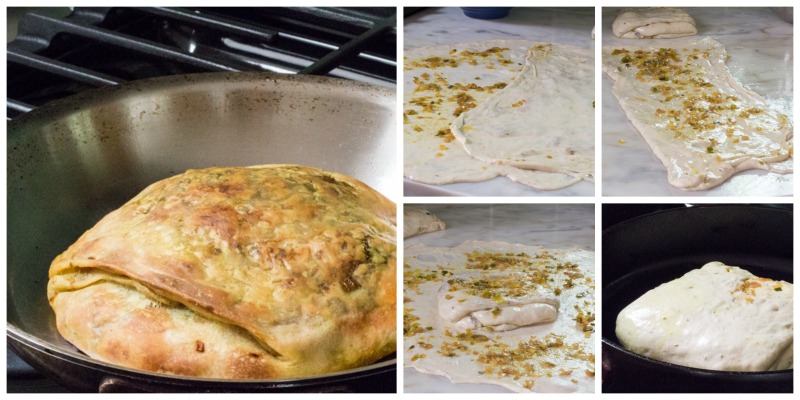
This is a traditional bread found in Northern Jordan that uses olive oil instead of butter to get the flaky layers. When you bite into it, the top couple of layers or more are crispy, but the layers become softer and chewier as you bite down through them. There's no yeast or chemical leavening agents, so the height of the bread is solely through the layers. You can go for more layers, but I was very happy with working with two balls of dough for each bread loaf. The onions add just the right amount of sweetness, and make this a very unique bread that will make you a rock star if you make it for your family and friends.
Want to Save This Recipe?
Enter your email & I'll send it to your inbox. Plus, get great new recipes from me every week!

Jordanian Matabaqa.. Layered Onion Bread
Ingredients
Bread Dough Balls
- 3 cups (16 ounces) all-purpose flour
- 1 teaspoon kosher salt
- ½ teaspoon fennel seeds
- 1 ½ cups warm water you may need a little more or less
- ¼ cup extra virgin olive oil
Filling
- ½ cup extra-virgin olive oil plus a little more for your work surface.
- 3 cups finely chopped yellow onions
- 1 teaspoon kosher salt
- ½ teaspoon ground allspice
- 1 teaspoon ground turmeric
Instructions
- In the bowl of a standing mixer whisk together the flour, salt, and fennel seed. Attach the dough hook, and slowly add the water up to 1 ¼ cups. Knead for 10 minutes, using the dough hook, until you get a smooth and sticky dough, adding more water as needed. It should be a very wet, stretchy dough so you can stretch it in the next step, but it should be dry enough to form a definable dough mound.
- Divide the dough into 4 balls, place in a large bowl, and drizzle generously with olive oil. Cover and rest the dough on the countertop for one hour. This resting period is crucial to the stretching process. Without resting the dough, it will contract too much each time you try to stretch it, and it would be very difficult to get it as thin as needed.
- Prepare the filling by heating up the olive oil in a heavy bottomed pot over medium-high heat. Add the onions and spices. Reduce the heat to medium-low, cover the pot, and lightly simmer for 15 minutes, or until the onions are limp and translucent. Drain the onions, and reserve the oil for another purpose. If you are working with a dark, hard surface, you can use it in the next step. I was working with white marble as my work surface and didn't want to risk the turmeric staining it.
- On a clean surface, drizzle a little oil and smear it with your hands. Place one of the dough balls on it and begin to flatten it with with palm of your hand and fingers. Next, start to spread it out into a circle. Soon you'll be able to lift up each side and gently stretch it from the middle. Work all around the circle of dough. Lastly, focus on stretching out the edges. Thanks to the oil, it shouldn't stick to your work surface. The result is a very thin circle of dough.
- Spread a little of the filling all over the surface of the dough with your hands. Imagine that you're folding a business letter to fit into a business envelope. Fold the dough over from the right towards the left with the dough only covering the middle third of the circle. Spread a little more filling on the dough. Fold the other third over the center. Spread a little more filling on the dough. Now fold the lower third of the long, narrow strip of folded dough up over the middle third, followed by a little more filling. Finally, fold the top third over the middle to form a neat packet of layers of dough.
- Put aside and stretch a second dough ball into a thin circle, and spread with filling, just like the first one. Place the packet of layered dough smack in the middle of the circle, and repeat the folding technique you followed for the first one. You'll end up with a packet of dough with double the layers of the first packet. You can continue this process to add additional layers up to 7 layers, but I stopped with 2 balls of dough per loaf.
- Repeat with the 2 remaining balls of dough to form a second loaf.
- Preheat the oven to 400˚ F, and drizzle a little olive oil onto the bottoms of 2 separate oven-safe pans. Place a finished layered loaf into each pan and rest for 30 minutes. Gently spread each loaf with your fingers to make it flatter and larger.
- Bake on the center rack for 40 minutes. I recommend checking it at 30 minutes, but mine took 40 full minutes to get a browned, crispy top. The inner layers were perfect.
- I served it with a dollop of yogurt on it, and Sawsan recommends a salad, which is a perfect complement.
Philip
What an exciting, well flavoured bread. This is one of several wonderful things to make this weekend. I cannot wait!
SallyBR
I am incredibly jealous that you got Sawsan's site... I am a huge fan of her blog and find her an amazing woman on so many levels.. too bad she lives far away, chances of meeting her face to face are slim.
still cooking from her blog is definitely a treat, isn't it?
your choice was perfect!
Anna
This sounds so good. You've explained it well, but I think I'll take your advice and go watch Sawsan's video. I am definitely thinking I need to make this soon.
Sawsan@chef in disguise
Hello Susan
Congratulations on finishing the move, I hate dealing with the technical stuff in blogging, they can be so frustrating sometimes
Your matabqa looks AMAZING
You did a brilliant job!
P.S.Thank you kindly for your kind words..they mean the world to me
Karen
This looks really interesting! Glad you are up and running again! Baking my own bread is pretty much an obsession for me! =)
Sid's Sea Palm Cooking
I made this a year or so ago for the SRC as well. Actually, I ended up making two of them, and they were good. Sawsan does have a great blog. Good choice.
Emily @ Life on Food
I am always on a bread kick. And I love try new types. This does look amazing! Great pick!
Karen Burns-Booth
Now that is a recipe that appeals to me on all levels and that I will be making soon, it looks and sounds amazing Susan! What an inspired SRC pick for June, Karen
Lauren Kelly Nutrition
I am so intrigued by thus bread! It looks amazing!
Lane & Holly @ With Two Spoons
This looks SO great! And the secret recipe club sounds awesome! Keep us in mind if you're ever looking for a new addition...we're small, but creative!
laura@motherwouldknow
Susan, Your matabaqa looks amazing! I have never heard of this particular type of bread before, but now I want to make it - right after I check out Sawsan's blog. Like you, I love making bread, but have to admit that I might be intimidated by this one if I didn't have you and Sawsan as guides. What a great Secret Recipe Club choice.
Megan @ MegUnprocessed
That sounds amazing!
Nicole - Crazed Mom
This looks so unique Susan, and sounds simply wonderful! I love it!
srp
excited to try this! can you please clarify the amount of flour req’d? is it 3 cups + 16oz of flour? or simply 1 lb of flour which should be approx 3 cups by volume? thx!
The Wimpy Vegetarian
Thank you for this question! When the recipe imported into a new program, it made this confusing. I'll go in and edit it right now. I normally equate 4.5 - 5.0 ounces for 1 cup of flour. But this one required a little more. If you weigh the flour, you will need 16 ounces.
The Wimpy Vegetarian
The recipe card is updated now. Thanks again, and I hope you love it!!