
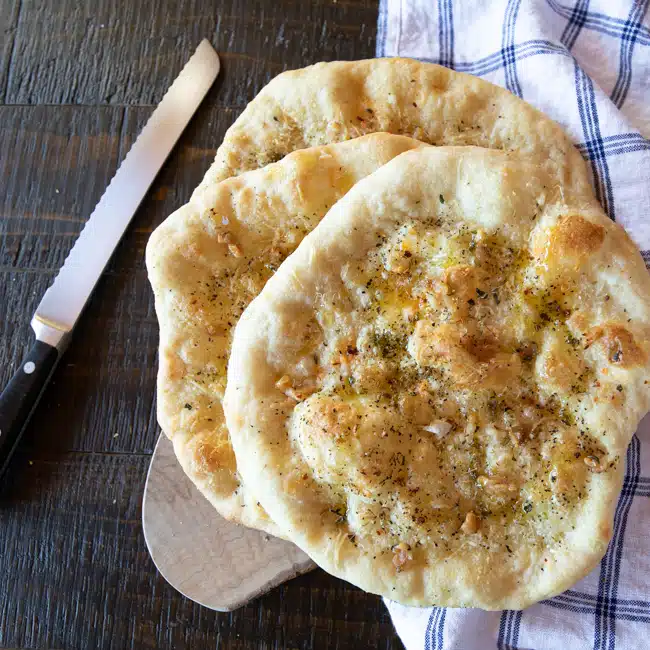
This is a simple pizza bread topped with ingredients found in an aglio e olio pasta dish. Olive oil, garlic, red pepper flakes, dried oregano, salt, pepper and Parmesan cheese.
It that can be torn up like garlic bread pieces to use alongside a meal, or for sopping up sauces and dipping into soups.
Jump to Recipe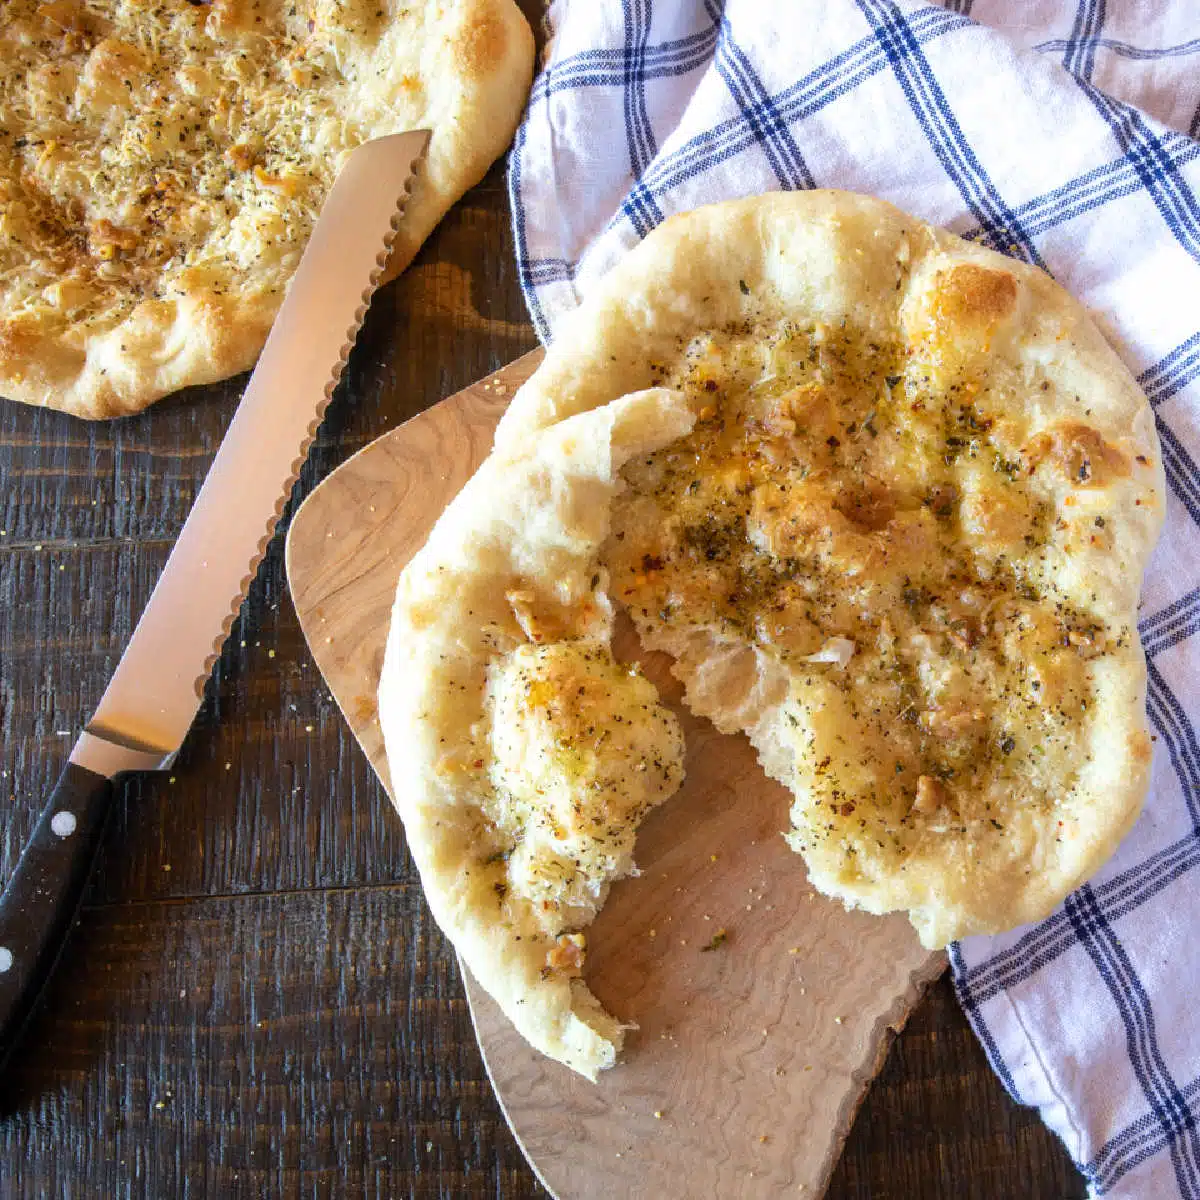
Want to Save This Recipe?
Enter your email & I'll send it to your inbox. Plus, get great new recipes from me every week!
Want to make this recipe perfectly the first time? I want to help with that. So, check out this Table of Contents to see which sections of this post will help you the most.
Jump to:
It's easy to be intimidated by making your own bread. Even flatbread. And even a yeasted flatbread like pizza. For non-yeasted flatbreads, check out this Farmhouse Rosemary-Parmesan Flatbread or Parmesan Piadine (Italian Flatbreads). These easy flour tortillas are another great option.
For more yeasted flatbreads, check out this pita and Turkish bread!
🤷♀️ What's an Aglio e Olio Pizza?
Aglio e olio is translated as garlic and oil, typically olive oil, and I borrowed this idea from a popular pasta dish in Italy. Aglio e Olio Pasta is a very simple pasta tossed with garlic and dried red pepper flakes sautéd in olive oil. At the end it's tossed with parsley and Parmesan cheese.
I adapted this idea to a pizza and swapped dried oregano for the parsley. Eat it as is, or dip it in a simple rosemary olive oil you can easily make at home.
👩🍳 Why This Recipe Works
- The dough hook on the standing mixer does a lot of the heavy lifting in getting the dough smooth and stretchy. This is what gives the dough the texture you want when it's all baked up.
- A slower rise always means better flavor. So an overnight slow rise in the refrigerator is a perfect approach.
- The dough must be at room temperature when you begin to stretch the dough.
- When stretching the dough into pizzas, only use your hands. Never use a rolling pin, as it will smash the air bubbles in the dough. The air bubbles are important as they great contribute to the texture when the pizza bread is baked. This video I found does a great job of demonstrating how to stretch pizza dough.
🧅 Main Ingredients + Notes
For the all of the ingredients, measurements and directions, go to the Recipe Card at the bottom of this post.
Pizza Bread
- Bread flour - King Arthur is my favorite for its consistency.
- Instant yeast - I usually use Fleischmann's but have used Red Star with great success too.
- Kosher salt - if you use sea salt or table salt, use half the amount called for in the recipe.
- Extra virgin olive oil - For more information on baking with olive oil, check out this post.
- Water
- Cornmeal
Aglio e Olio Topping
- Garlic
- Extra virgin olive oil
- Dried red pepper flakes
- Dried oregano
- Kosher salt
- Ground black pepper
- Grated Parmesan cheese - to keep this vegetarian, use a plant-based Parmesan style cheese.
Disclosure: This post may contain affiliate links to products and foods I use in my kitchen. This means that at no additional cost to you, I will earn a commission if you click through and make a purchase. To view my entire storefront of recommended kitchen tools and equipment, check out my shop on Amazon.
📝 Instructions Overview
Detailed instructions for making this pizza aglio e olio bread are in the recipe card below, but here's a quick overview!
Step 1
Make the dough. Whisk the flour with the instant yeast in the bowl of your standing mixer. Switch to a paddle attachment, and add in the olive oil, water and salt.
Step 2
Knead and first rise. Transfer the dough to a work surface, knead a few times, and divide the dough into 6 pieces. Roll them into balls, place on a baking sheet, cover and refrigerate overnight.
Step 3
Second rise. Remove the dough from the refrigerator, and bring to room temperature. Then press each ball into a flattened disk. Cover and let the dough rise. Make the pan-roasted garlic.
Step 4
Make pizza. Stretch the disks into pizzas. Sprinkle the toppings over the pizzas, and bake at a very high temperature.
💡Ideas for Possible Variations
Load up your pizza with your favorite topping and use this dough as a more traditional pizza, if that's your preference. For example, I modeled this BBQ Chicken Pizza with Poblano Peppers and Pepitas from a restaurant I love (the recipe has a vegetarian option).
Or top with Balsamic Roasted Tomatoes, mozzarella cheese, bake and finish with a sprinkling of Roasted Chickpeas.
Want to Save This Recipe?
Enter your email & I'll send it to your inbox. Plus, get great new recipes from me every week!

Aglio e Olio Pizza
Equipment
- Kitchen scale
- baking sheet
Ingredients
Pizza Dough
- 4 ½ cups (20.25 oz) bread flour plus more for dusting the counter and your hands
- 1 teaspoon instant yeast
- 2 ½ teaspoons kosher salt
- ¼ cup extra-virgin olive oil plus more for oiling the dough
- 1 ¾ cups ice water divided
- ½ cup cornmeal
Aglio e Olio Topping
- 18 large garlic cloves peeled
- 1 cup extra-virgin olive oil see Notes
- 1 teaspoon red pepper flakes
- 1 ½ teaspoons dried oregano
- 2 tablespoons freshly grated Parmesan cheese
- 1 teaspoon kosher salt
- ¾ teaspoon ground black pepper
Instructions
Pizza Dough
- Whisk the flour with the instant yeast and salt in the bowl of a standing mixer.
- Using the paddle attachment, mix in the olive oil and 1 ½ cup of ice water. Mix on low until the liquid is absorbed. Switch to a dough hook, and mix on medium for at least 5 minutes. The dough should stick to the bottom of the bowl. If it completely clears the bottom, add a little more water. No dough should stick to the sides of the bowl. The dough should be smooth, elastic and slightly sticky (more than just tacky to the touch).
- Mist a sheet pan with oil, and set it aside. I have a quarter sheet pan I use for this, because it fits well into my refrigerator. But a half sheet pan works fine. Lightly flour a work surface, such as a countertop.
- Use a flexible dough scraper to transfer the dough from the bowl to the floured work surface. Knead a few times, and divide the dough into 6 equal pieces. To do this, I weigh the dough, and then weigh out 6 equal pieces. I slice the dough using the bench scraper. A knife or your fingers work fine for this too.
- Roll each dough piece into a ball with your hands, and place the balls on the oiled sheet pan. Spray or rub the surfaces of the dough rounds with oil. Completely cover with plastic, and slide into the refrigerator for at least over night, and up to 3 days.
- Remove the dough from the refrigerator and allow to rest on the counter at room temperature for at least 2 hours.
- Lightly oil another sheet pan. Lightly flour a work surface, such as a countertop. Remove one dough round from the original sheet pan, and re-cover the rest. Sprinkle the dough lightly with flour, and your hands. Gently press the dough round down into a disk about 5" in diameter. Place it on the newly oiled sheet pan. Repeat with the rest of the dough rounds. You'll need 2 sheet pans to accommodate all 6 disks. Lightly oil the tops of the disks, and cover with plastic.
- Let rise for 2 hours on the counter. Place a baking stone on the middle rack of the oven, and preheat the oven to 500˚F.
- Lightly flour a workspace, such as a countertop, and your hands. Lift one dough round from the sheet pan, a re-cover the rest. Begin to press the dough out, using your fingers. Once the middle is pressed out a bit, and only a bit, focus on the periphery of the central middle section, while leaving the outside rim completely alone. As you press the dough out the outside rim will become the crust of the pizza.Cover with plastic, and repeat with the other discs of dough.
- Next is stretching the dough to around 9 inches in diameter. In culinary school, we did the knuckles technique, and once you get the hang of it, it works well. However, it takes a some trial and error, and dough falling to the floor, to get it done. Instead, I recommend cupping your hands on top of the dough, with the edges of your hands stretching the dough outwards. I found a great video showing this, and other techniques, and I recommend you watch it if this is at all new to you, or if you want to perfect your technique.The middle will stretch out the most. So, it's important to pay attention to it as you stretch the dough outward, and continue to move the dough around in a circle on the workspace as you stretch it. Don't expect to get it perfect the first time. I promise you, it gets a lot easier after the first one.
- Place the pizza dough back down on the cutting board, and stretch out the edges a bit, if the dough is uneven in thickness. The pizzas bake up best when the thickness is fairly similar across the dough. If the dough is too thin in some places, that area will bake faster, and potentially burn, since the oven is so hot.Cover with plastic and repeat with the rest of the dough rounds.
- Baste each dough round with the garlic oil from the Pan-Roasted Garlic (see below recipe). Sprinkle with the garlic, dried red pepper flakes, oregano, salt and pepper. Make sure the dough rounds slide easily on your work surface, and slide onto a pizza peel. If you don't have a pizza peel, turn a baking sheet upside down, and slide the pizza dough circle onto the back of the baking sheet. From there, slide it only the baking stone.
- Bake for 5 - 8 minutes, depending on how thick the dough is, and how deeply browned you like your pizza flatbread. Repeat with the other disks. If you don't have a pizza peel, it can be tricky to get the pizza off the pizza stone. The best way I've found is use tongs to slide the off the stone directly onto a cutting board, sheet pan or large plate. I've used tongs with silicone tips the best to use for this.
Pan-Roasted Garlic
- Place the garlic in a small skillet or pot, large enough for them to all lay flat. Cover with olive oil, and bring to a very, very low simmer. Simmer for 15 minutes, or until soft.Remove from the heat, and fish out the garlic cloves. When they've cooled enough to handle, mince them.This step can be done ahead while the bread is rising.
Wendy Klik
This sounds delicious. I love garlic bread and this sounds like a great version.
The Wimpy Vegetarian
Yes, it's a lot like garlic bread, but chewier from the gluten development. Thanks so much!
Stacy
I love how light and fluffy your pizza looks, Susan! Often the simplest flavors are the best and you can't beat garlic and good olive oil for simplicity! Delicious.
The Wimpy Vegetarian
I agree. Aglio e olio pasta, for example, is still one of my favorites that I make on a regular basis, and order often when I'm in Italy!
Karen
Perfect for sopping up sauces. Just the right amount of flavor. Plus, it's gorgeous.
The Wimpy Vegetarian
Yeeeesssss, it's perfect for sopping!! Thanks so much!
Kelly
THIS. This is what I am doing with my extra piece of pizza dough! Love garlic.
The Wimpy Vegetarian
Oh yes, so do I. Garlic and I go way back!
Rebekah Hills
That crust is bubby and beautiful and you cannot go wrong with garlic!
The Wimpy Vegetarian
I loved how the yeast made it all bubbly - making it perfect for a pizza bread!
Swathi
Thia aglio-e-olio pizza looks really yum. I would love to try it as my kids are pizza fans.
The Wimpy Vegetarian
This is perfect for kids. Just adjust the garlic up or down, according to their tastes!
Namita
Hello Susan, I am in love with your pizza. It is so so simple. Overnight dough recipes really suit me and this recipe is bookmarked! I am also going to be visiting your blog for other yummy treasures!
The Wimpy Vegetarian
I adore overnight dough recipes. The flavor is better, and then I can split the rising times between a couple days. Thanks so much!
Radha
This is simply great! We love the simple garlic and olive oil pasta, and we would this one loo! They look amazing and delicious!
The Wimpy Vegetarian
I admit I like simple pizzas best sometimes! Thanks so much!!
Renu
This looks so delicious and with all that garlic and olive oil, I am sure it will taste yum.
The Wimpy Vegetarian
This is my favorite pizza dough recipe by far, but this is the first time I did it aglio e olio style for the toppings.
Roberta
Can I freeze the dough or halve the recipe?
The Wimpy Vegetarian
You can do either. I've frozen the dough with great success. And if you halve the recipe, no other changes are necessary.
Sue Lau
I'd love to sip wine and tear off pieces to dunk into marinara as a first course. Yum!
Kelster
I like the simplicity of garlic and a little cheese.