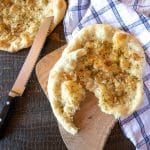
Aglio e Olio Pizza
This is a simple pizza bread that can be torn up like garlic bread pieces. Use it alongside a meal, for sopping up sauces or dipping into soups. One serving is 1 9-inch pizza round. The nutrition calculations assume all of the olive oil will be used, but you will have some left over for other uses. The cooking time is 5 - 8 minutes per batch of pizzas you bake at one time.
Servings: 6 9" pizza rounds
Calories: 815.4kcal
Equipment
- Kitchen scale
- baking sheet
Ingredients
Pizza Dough
- 4 ½ cups (20.25 oz) bread flour plus more for dusting the counter and your hands
- 1 teaspoon instant yeast
- 2 ½ teaspoons kosher salt
- ¼ cup extra-virgin olive oil plus more for oiling the dough
- 1 ¾ cups ice water divided
- ½ cup cornmeal
Aglio e Olio Topping
- 18 large garlic cloves peeled
- 1 cup extra-virgin olive oil see Notes
- 1 teaspoon red pepper flakes
- 1 ½ teaspoons dried oregano
- 2 tablespoons freshly grated Parmesan cheese
- 1 teaspoon kosher salt
- ¾ teaspoon ground black pepper
Instructions
Pizza Dough
- Whisk the flour with the instant yeast and salt in the bowl of a standing mixer.
- Using the paddle attachment, mix in the olive oil and 1 ½ cup of ice water. Mix on low until the liquid is absorbed. Switch to a dough hook, and mix on medium for at least 5 minutes. The dough should stick to the bottom of the bowl. If it completely clears the bottom, add a little more water. No dough should stick to the sides of the bowl. The dough should be smooth, elastic and slightly sticky (more than just tacky to the touch).
- Mist a sheet pan with oil, and set it aside. I have a quarter sheet pan I use for this, because it fits well into my refrigerator. But a half sheet pan works fine. Lightly flour a work surface, such as a countertop.
- Use a flexible dough scraper to transfer the dough from the bowl to the floured work surface. Knead a few times, and divide the dough into 6 equal pieces. To do this, I weigh the dough, and then weigh out 6 equal pieces. I slice the dough using the bench scraper. A knife or your fingers work fine for this too.
- Roll each dough piece into a ball with your hands, and place the balls on the oiled sheet pan. Spray or rub the surfaces of the dough rounds with oil. Completely cover with plastic, and slide into the refrigerator for at least over night, and up to 3 days.
- Remove the dough from the refrigerator and allow to rest on the counter at room temperature for at least 2 hours.
- Lightly oil another sheet pan. Lightly flour a work surface, such as a countertop. Remove one dough round from the original sheet pan, and re-cover the rest. Sprinkle the dough lightly with flour, and your hands. Gently press the dough round down into a disk about 5" in diameter. Place it on the newly oiled sheet pan. Repeat with the rest of the dough rounds. You'll need 2 sheet pans to accommodate all 6 disks. Lightly oil the tops of the disks, and cover with plastic.
- Let rise for 2 hours on the counter. Place a baking stone on the middle rack of the oven, and preheat the oven to 500˚F.
- Lightly flour a workspace, such as a countertop, and your hands. Lift one dough round from the sheet pan, a re-cover the rest. Begin to press the dough out, using your fingers. Once the middle is pressed out a bit, and only a bit, focus on the periphery of the central middle section, while leaving the outside rim completely alone. As you press the dough out the outside rim will become the crust of the pizza.Cover with plastic, and repeat with the other discs of dough.
- Next is stretching the dough to around 9 inches in diameter. In culinary school, we did the knuckles technique, and once you get the hang of it, it works well. However, it takes a some trial and error, and dough falling to the floor, to get it done. Instead, I recommend cupping your hands on top of the dough, with the edges of your hands stretching the dough outwards. I found a great video showing this, and other techniques, and I recommend you watch it if this is at all new to you, or if you want to perfect your technique.The middle will stretch out the most. So, it's important to pay attention to it as you stretch the dough outward, and continue to move the dough around in a circle on the workspace as you stretch it. Don't expect to get it perfect the first time. I promise you, it gets a lot easier after the first one.
- Place the pizza dough back down on the cutting board, and stretch out the edges a bit, if the dough is uneven in thickness. The pizzas bake up best when the thickness is fairly similar across the dough. If the dough is too thin in some places, that area will bake faster, and potentially burn, since the oven is so hot.Cover with plastic and repeat with the rest of the dough rounds.
- Baste each dough round with the garlic oil from the Pan-Roasted Garlic (see below recipe). Sprinkle with the garlic, dried red pepper flakes, oregano, salt and pepper. Make sure the dough rounds slide easily on your work surface, and slide onto a pizza peel. If you don't have a pizza peel, turn a baking sheet upside down, and slide the pizza dough circle onto the back of the baking sheet. From there, slide it only the baking stone.
- Bake for 5 - 8 minutes, depending on how thick the dough is, and how deeply browned you like your pizza flatbread. Repeat with the other disks. If you don't have a pizza peel, it can be tricky to get the pizza off the pizza stone. The best way I've found is use tongs to slide the off the stone directly onto a cutting board, sheet pan or large plate. I've used tongs with silicone tips the best to use for this.
Pan-Roasted Garlic
- Place the garlic in a small skillet or pot, large enough for them to all lay flat. Cover with olive oil, and bring to a very, very low simmer. Simmer for 15 minutes, or until soft.Remove from the heat, and fish out the garlic cloves. When they've cooled enough to handle, mince them.This step can be done ahead while the bread is rising.
Notes
Use enough olive oil to cover the garlic cloves in a small pan. You'll have olive oil left over, which you can save for other purposes.
Nutrition
Calories: 815.4kcal | Carbohydrates: 83.1g | Protein: 14.4g | Fat: 47.7g | Saturated Fat: 6.8g | Polyunsaturated Fat: 5.7g | Monounsaturated Fat: 33.3g | Cholesterol: 1.4mg | Sodium: 1587mg | Potassium: 198.2mg | Fiber: 4.3g | Sugar: 0.4g | Vitamin A: 166.5IU | Vitamin C: 2.8mg | Calcium: 101.6mg | Iron: 2.3mg